Experimental Physics - 4
COMBINATION OF ERRORS:-
If two physical quantities are A ±  A and B ±
  B, where
  A and
A and  B are absolute errors, then the error of the combination on performing algebraic operations is given by:-
| Operation | Formula | Absolute Error | Relative Error |
| Sum Difference Multiplication Division Power Root | A + B A - B A x B A/B An A1/n |  A + A +  B B A - A -  B BA  B + B B + B A A nAn - 1  A A |       |
Illustration:- The resistance R = V/I where V =(100 ± 5)v and I = (10 ± 0.2)A. Find the percentage error in R.
Solution:- For division relative errorwill be given by


% error = Relative error x 100 =
 x 100 = 7 %
 percentage error in value of resistance is 7 % Ans.
Dumb Question:- In case of A - b also we have added the error quantities
 A +
A +  B to obtain Absolute error why ?
Ans- While notifying the absolute error, we Actually mention the maximum possible error involved. Maximumcan possible error can be obtained by adding the two individual absolute errors,
 we don't know whether the error is on +ve side or on -ve side.
EXPERIMENTS:-
1 VERNIER CALLIPERS:-
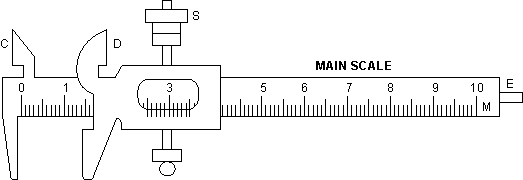
It is device used to measure accurately up to 0.1 mm. There are two scales in the vernier callipers, vernier scale & main scale. The main scale is fixed where as the vernier scle is movable along the main scale.
Its main part are:
1. Main scale: It consists of a steel metallic strip M, graduated in cm and mm at one edge and in inches and tenth ofan inch at the other edge on same side. It carries fixed jaws a and c projected at right angle to the scale as shown in figure.

(2) Vernier scale: A vernier V slides on the strop M. it can be fixed in any position by screw S. It is graduated on both sides. The side of the vernier scale which slides over the mm side has ten divisions over the length of 9 mm. i.e., over 9 main scale divisions and the side of the vernier scale which slides over the inches side has 10 divisions over a length of 0.9 inch, i.e., over main scale divisions.
(3) Movable Jaws: The vernier scale carries jaws B and D projecting at right angle to the main scales. These are called movable jaws. When vernier scale is pushed toward A and C, Then as B touches A, straight side of D will toudh straight side of C. In this positions, in case of an instrument free from errors, zeros of vernier scale will coincide with zeros of main scales, on both the cm and inch scales
the cm and inch scales.
(The object whose length or external diameter is to be measured is held between the jaws A and B, while the straight edges of C and D are used for measuring the internal diameter of a hollow object.
(4) Metallic Strip: There is a thin metallic strip E attached to the back side of M and connected with vernier scale. When the jaws A and B touch each other, the edge of strip E touches the edge of M. When the jaws A and B touch each other, the edge of strip
E touches the edge of M. When the jaws A and B are separated, E moves outwards. The strip E is used for Measuring the depth of a vessel.
LEAST COUNT CALCULATION:-
Slide the movable jaw till the zero of vernier scale coincides with any of the mark of the main scale and find the number of division (n - 1) on the main scale coinciding with n divisions on vernier scale. Then
n.V.S.d = (n - 1)M.S.D
=> I.V.S.D. =
 M.S.D. = (1 -
  ) M.S.D.
Least Count = 1M.S.D. - 1V.S.D. = [1 - (1 -
 )] M.S.D.
=
 M.S.D.
Least count is also called vernier constant , in case of vernier callipers.
2. Determination of zero error and Zero correction:
For this purpose, movable jaw B is brought in contact with fixed jaw A.
One of the following situation will arise.
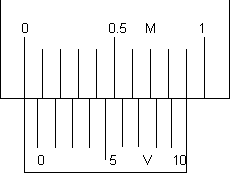
(i) Zero of vernier scale coincides with zero of main scale (see figure)

In this case, zero error and zero correction both are nil.
Actual length = observed (measured) length.
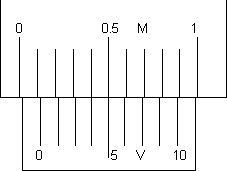
(ii) Zero of vernier scale lies on the right of zero of main scale (see figure)

Here 5th vernier scale division is coinciding with any main scale division.
Hence, N = 0, n = 5, L.C. = 0.01cm
Zero error N = n x (L.C.) = 0 + 5.0.01 = + 0.05cm
Zero correction = - 0.05cm
Actual length will be 0.05cm less than the observed (measured) length.

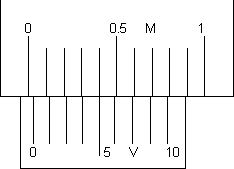
Here, 5th vernier scale division is coinciding with any main scale division.
In this case, Zero of vernier scale lies on the right of - 0.1 cm reading on main scale.
Hence N = - 0.1cm, m = 5, L.C. = 0.01cm
Zero error = N + n x (L.C.) = - 0.1 + 5 x 0.01 = 0.05cm
Zero correction = + 0.05cm
Actual length will be 0.05 cm more than the observed (measured) length.
Dumb Question:- The least count of verniers Callipers is 0.1 mm. The main scale reading before the zero of the vernier scale is 10 and the zeroth division of the vernier scale coincides with the main scale division. Given that each main scale division is 1mm, the measured value is.
Ans:- Length measured by vernier callipers is given by
= reading before the zero of vernier scale (main scale reading) + Number of vernier scale divisionary coinciding with main scale division x least count
In this case which is
= 10mm + 0 x 0.1mm = 10mm = 1.00cm
take a note that we have given the answer with proper significant figure, which indicates accuracy of our instrument.