Experimental Physics - 5
SCREW GAUGE:
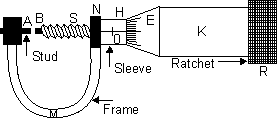
This instrument (shown in figure) works on the principle of micrometer screw. It consists of a U-shaped frame M. At one end of it is fixed a small metal piece A of gun metal. It is called stud and it has a plane face. The other end N of M carries a cylinderical hub H. The hub extends few millimeter beyond the end of the frame On the tubular hub along its axis, is drawn a line known as reference line. On the reference line Graduations are in millimetre and half milimeter depending upon thepitch of the screw. This scale is called linear scale or pitch scale. A nut is threaded through the hub and the frame N. Through the nut Moves a screw S made a gun metal. The front face B of the Screw, facing the plane face A, is also plane. A hollow cylinderical cap K, is capable of rotating over the hub when screw is rotated. It is attached to the right hand end of the screw. As the cap is rotated the screw either moves in or out. The bevelled surface E of the cap K is divided into 50 or 100 equal parts. It is called the circular scale or head scale. Right hand end r of K is middle for proper grip.
In most of the instrument the milled head R is not fixed to the screw head but turns it by a spring and ratchet arrangement such that when the body is just held beteen faces A and B , the spring yields and milled head R turns without moving in the screw.
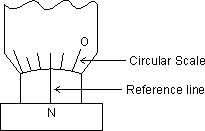
In an accurately adjusted instrument when the faces A and B are just touching each other, the zero marks of circula scale and pitch exactly coincide
Least count determination:-
Note the value of linear scale division (pitch). Rotate Screw to bring by zero mark on circular (head) scale on reference line. Note linear scale reading i.e number of divisions of linear scale uncovered by the cap.
Now give the screw a few know number of rotations(one rotation completed when zero of circular scale again arrives on the reference line).again not the linear scale reading. Find the difference of two reading on linear scale to find distance moved by the screw.
Pitch of the screw = 
Now count the total number of divisions on circular (head) scale.
Then, the least count = 
Least count is generally 0.001cm.
Zero Error and Zero correction:
(i) Nil zero error and zero correction.
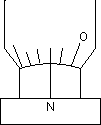
(ii) Zero mark of circular scale remains on right of reference line and does not cross it.
here 2nd division on circular reference line. Zero reading is already 0.02 mm.
It makes Zero error + 0.02 mm and thus zero correction - 0.02 mm
Thus actual thickness = measured thickness - 0.02 mm
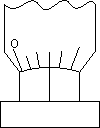
(iii) Zero mark of circular scale goes to left on reference line after crossing it.
Here zero of circular scale has advanced from reference line by 3 divisions on circular scale. A backward rotation by 0.03 mm will make reading zero. zero error = - 0.003 mm zero correction = + 0.03 mm
 Actual thickness = Measured value + 0.03mm
Dumb Question:- A student measured the diameter of a wire using a screw gauge with least count 0.001 cm and listed the measurement which among the following should be the correct measurement.
(a) 5:320cm (b) 5.3 cm (c) 5.32cm (d) 5.2300cm
Ans:- The Reported answer should have value, such that the uncertain digit should be of the order least count.
As an instrument cannot give measurement more accurate than its leastcount. Moreover, if the uncertain digit is zero, then also it must be included in the reported answer. 5.320 cm should be the diameter.
SEARLES METHOD
Experiment 3:
Aim: To determine Young’s Modulus of the material of agiven wire using Searle’s Method.
Apparatus: Searle’s Apparatus, two long steel wires of same length of diameter, ameter scale, a screw guage, eight (1/2) kg slotted weight and a 1 kg hanger.